Strapping Machines: How to Use a Strapping Tensioner & Sealer Tool
In today’s fast-paced world, efficient packaging solutions are crucial for businesses to streamline their processes and ensure the safe transportation of goods. One essential tool that helps in achieving this is a strapping tensioner & sealer. In this YouTube video, we will demonstrate how to effectively use a strapping tensioner & sealer tool, providing you with the knowledge and skills to optimize your packaging operations.
Before we delve into the details, let’s understand the importance of strapping machines. Strapping machines are designed to securely hold boxes, pallets, or other items together using sturdy straps. These machines offer a cost-effective and reliable method of packaging, reducing the risk of damage during transit and ensuring the integrity of your products.
Now, let’s dive into the steps of using a strapping tensioner & sealer tool:
Step 1: Prepare your strapping material
Start by selecting the appropriate strapping material based on the weight, size, and nature of the items you need to secure. Ensure that the strapping material is of high quality and compatible with your strapping machine. This will ensure a secure and reliable strap.
Step 2: Load the strapping material onto the machine
Carefully load the strapping material onto the strapping machine, ensuring that it is correctly positioned and aligned. Follow the manufacturer’s instructions for loading the material, as different machines may have slight variations in the process.
Step 3: Adjust the tensioner
Next, adjust the tensioner to achieve the desired tension for your strapping. The tension should be tight enough to secure the items firmly but not too tight that it damages the products. Each strapping machine may have different tension adjustment mechanisms, so refer to the user manual for specific instructions.
Step 4: Apply tension to the strapping
Once the tensioner is adjusted, apply tension to the strapping by pulling the strapping material through the tensioning mechanism. This will ensure that the strap is securely tightened around the items.
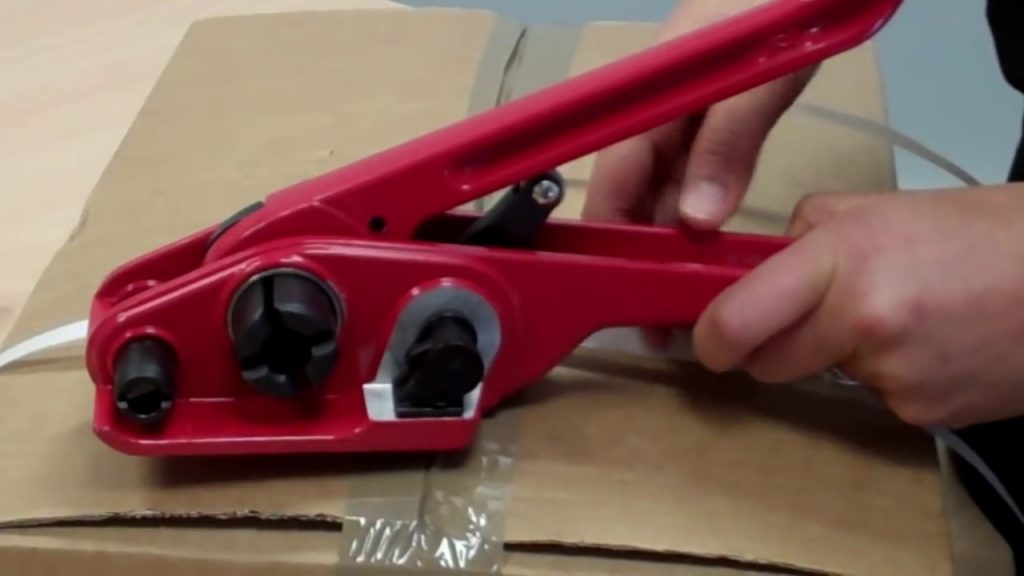
Step 5: Seal the strapping
After achieving the desired tension, it’s time to seal the strapping. Position the sealer tool over the strapping and squeeze the handles together firmly. This will create a seal, joining the two ends of the strapping together.
Step 6: Cut the excess strapping
Using a strapping cutter, remove any excess strapping material to achieve a neat and professional finish. Be careful while cutting to avoid any injuries.
Congratulations! You have successfully used a strapping tensioner & sealer tool to secure your items. Repeat the process for additional straps as needed.
By incorporating a strapping tensioner & sealer tool into your packaging operations, you can enhance efficiency, save time, and ensure the safety of your products during transportation. Investing in a high-quality strapping machine and mastering its usage will undoubtedly prove beneficial for your business.
Check the coil packing solution with leading manufacturers for professional solutions just here:
Remember, efficient packaging is the cornerstone of successful logistics. Mastering the art of using a strapping tensioner & sealer tool will set you on the path to optimized packaging and secure product transportation. So, harness the power of strapping machines and elevate your packaging game today! Strapping Machines
“Mastering Strapping Techniques: Efficiently Operating Strapping Tensioner, Sealer Tool, and Machines”